Varieties to collect
(page updated: Jan 1/22)
I am a firm believer in hands-on training. Whether it is to learn a new computer program or Machin stamps, having someone show you the "ins and outs" can make all the difference.
I wish I had someone to show me actual Machin stamps and point out the various varieties!
The discussions found here are based on the methods of self-study of the Machins. They are not a complete study - I will leave that up to the experts. These are written by a novice Machin collector for other novice Machin collectors. As you will see from other philatelic parts of this web site, I enjoy the study and identification of definitives (particularly in my home country of Canada).
How detailed do you get when sorting your Machins? The most detailed (ie. complete, specialized) Machin catalogue on the market today is The Complete Deegam Machin Handbook (simply put, this is a must have book by all Machin collectors). The Deegam book suggests collecting the Machins in 3 levels. I use 4 levels. However, what I include at each level is a bit different - but that is just a personal taste.
Sorting Machins
How different does one stamp have to be from another before you will collect it?
See: Simplyfying the Machins free PDF document for an expanded printed version of the following list.
The degree to which you "specialize" is determined by how you define a variety. One of the joys of stamp collecting is that you determine what you want to collect and how to collect your material.
I would suggest that most collectors limit their collection to what is shown in the album they have purchased - and there is nothing wrong with this. The longer one collects, the more one reads about his/her hobby and the more knowledge (and stamps!) one accumulates. In many cases this means narrowing the scope of ones collection, thus "specializing" begins to occur (whether you like it or not) on selected parts of the collection.
As you study used Machins, you will undoubtedly begin to separate your "hoard" of stamps into more and more varieties.
Here are 26 different ways to specialize your Machin collection:
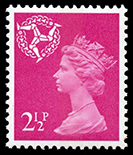
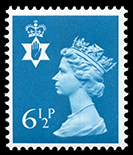
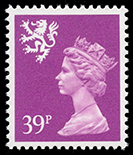
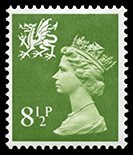
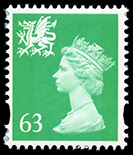
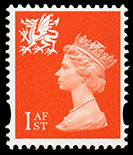
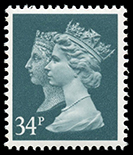
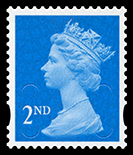
This is obvious. Many Machins have been issued with a heraldic symbol in the upper left corner representing one of four regional countries: Northern Ireland (Right Red Hand of Ulster), Scotland (Lion of Scotland), Wales and Monmouthshire (Dragon of Wales), and Isle of Man (Three legs of Man).
Summarized checklists are available on this site for each of these countries (use search options to left).
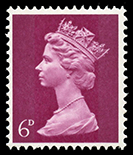 When the first Machin stamps were introduced in 1967, Great Britain was still using the sterling currency, where twelve pence equaled one shilling and twenty shillings equaled one pound. These three units were known as ‘L.s.d.’ (from the Latin: Libra, solidi, denarii).
On the Machin stamps, pence was indicated with a ‘d’; shilling was shown as 1/-; and the pound symbol is written as £.
There were 16 pre-decimal Machin definitives in the small format and four in a larger size.
All pre-decimal stamps, except the £1, were withdrawn on November 25, 1971 and were invalidated on March 1, 1972.
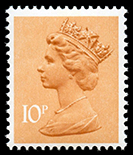 Decimal currency, introduced on February 15, 1971, has 100 pence to one pound. The letter p, for pence, is normally used only for amounts of less than £1. Amounts above £1 are written as, for example, £1.20. The system included a halfpenny (½p), until the end of 1984.
Starting in mid 1997, regional stamps from Wales began to appear without the designation of ‘p’ after the value. In 2000, a Wales Ist non-value indicated stamp was issued in a bilingual format (I AF/ST). [These are not errors.]
 This is obvious. In 1990, to commemorate the 150th anniversary of the first postage stamp (the Penny Black, issued by Great Britain in 1840), special Machin designs were issued. These showed Queen Victoria (from the Penny Black) placed behind the familiar Queen Elizabeth Machin portrait.
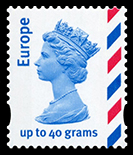 First introduced in 2003. different types of services have been seen:
- region (Europe, Worldwide, Postcard)
- service (Large, Recorded Signed For, Royal Mail Signed For)
- special delivery
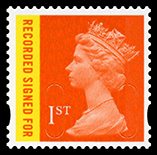
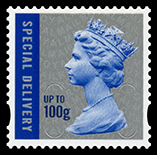
These inscribed stamps are very distinct.
By far, the vast majority of Machin stamps have been issued in a “small”, standard postage-stamp size. However, different sizes have been issued over the years.
The early high-value stamps, through 1977, were of a larger size. Different service inscribed Machins are a different size from the standard Machins.
A very large “Horizon Gold” label, tested in 2009 and released in a countrywide roll-out in 2010, included the Machin design.
 Introduced in 2009, these Machins have either "slits" and/or background text
to provide some security.
Introduced in 2009, these Machins have either "slits" and/or background text
to provide some security.Different types of slits and text have been used.
Four different kinds of slits have now been seen and different letter "coding" in the background text has been introduced.
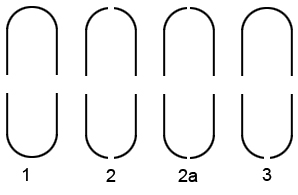 Security
slit types:
Security
slit types:
- 1 - no cuts at top and bottom
- 2 - cuts at top and bottom are wider than 2a
- 2a - cuts at top and bottom are narrower than 2
- 3 - no cut at top; cut at bottom
Background text letter coding:
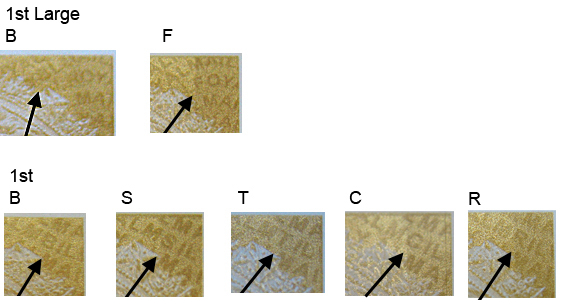
The first group of Machins with security features had background text and slits. subsequent printings included single-letter coding to denote the source of the stamp, and, starting in 2010, a year-indicator was placed just in front of the Queen's image.
| Letter code | Source |
| B | Business sheet |
| C | Custom (definitive and commemorative pane) |
| F | booklets of four stamps |
| S | booklets of six stamps |
| T | booklets of twelve stamps |
| R | Rolls of 10,000 stamps |
| P | Prestige booklet |
| M | Miniature sheet |
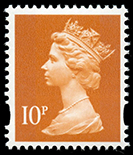
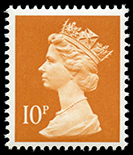
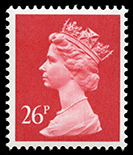
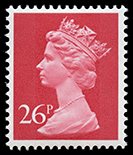
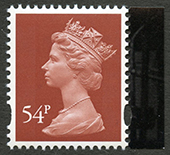
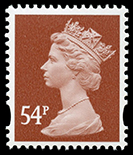
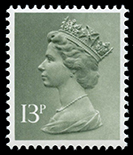 This is obvious. A distinctly different colour is certainly a new, collectible variety (some collectors will even go into "shades" - there are a few Machins that have distinct shade varieties).
 This is obvious.
For security reasons, starting in 1993, Machin stamps began to appear with elliptical perfs (towards the bottom on both sides of the stamp).
Machin stamps with elliptical perfs began to appear in 1993. They were instituted as a security feature. Since then, two types of perfs have been identified:
- narrow at top and bottom, with rounded sides (eR)
- wide at top and bottom, with almost straight sides (eS)
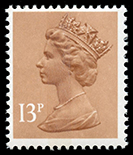
 This is obvious. In 1983 newly designed numerals (narrower) began to appear. These were required because the larger values (eg. 20½) took up too much room on the stamp! Some values exist with wide and narrow values - certainly two different varieties.
 Two values, issued in January 2010, accidently had a different font used for the values.
The 5p and 54p stamps had been previously issued with the same colours. The 2010 printing from a prestige-type booklet produced these two interesting varieties.

 With a little observation, this is obvious. In 1997 a new profile of the Queen was introduced. The new EME image offers better detailing of the Queen. Once you have reference copies, the differences are quite noticeable.
Self-adhesive:
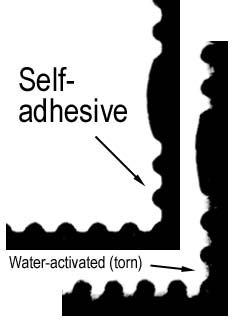
Self-adhesive stamps are die cut around the entire stamp during the printing process. On Machin stamps, all die cutting resembles perforated stamps (die cutting can take virtually any shape imaginable, including a straight edge).
The public simply peels a self-adhesive stamp from its backing paper. There is no folding and tearing to separate one stamp from another, as is required with water-activated stamps. As a result, a close look at the perforations will indicate if the stamp was torn from an adjacent stamp leaving rough edges of paper fibres. If so, it must be a water-activated stamp (see below).
On a self-adhesive stamp, all simulated perforations on all four sides will be 100% clean looking, unless of course a used stamp has been handled roughly during the any of the following stages: removal from the backing paper, applying to the envelope, soaking from the envelope, or sorting and storing.
Perforate and imperforate stamps are certainly collectible.
So too is a change in perforation. Three different perforation gauges have been used on the 'small-size' Machins - many Machins exist with two different perforations (only one issue exists with three different gauges).
These perf changes are easy to identify with the aid of a perforation gauge. As you study the stamps you may acquire the ability to separate your Machins by "look" alone (ie. without the aid of a perf gauge).
Technically, a perforation gauge is not required to check the various perforations used on Machins (just count the number of perfs across the stamp). However, having one will certainly speed up the monotonous task.
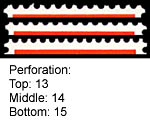 Three different perforations have been used on the small-sized Machins:
- 15 x 14 (most)
- 13½ x 14
- 12 3/4 x 13 (one stamp, done in error)
The Pre-decimal Machins, large-sized Machins, and self-adhesive Machins only had one perforation used so you do not need to worry about perforations on these.
[ The above discussion suggests the most common way that perfs are noted in most catalogues and price lists. To be completely accurate, the perf 15 x 14 is actually 14 3/4 x 14; 13½ x 14 is either 13½ x 14 (Questa and Waddington) or 13 3/4 x 14 (Walsall). ]
Since the first postage stamp was issued in 1840, various methods of printing have been employed to produce the hundreds of thousands of stamps that are needed by postal administrations.
Some times, the "same stamp" (i.e. design) is printed by 2 or more different printing methods. A stamp printed by the engraved method (recess printing, consisting of lines to form the image) will certainly look different from the one printed by photogravure (consisting of dots to form the image).
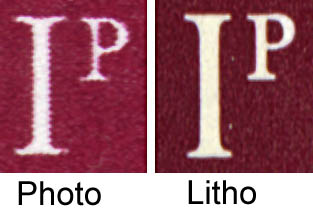 During the Machin era, some of the designs have been produced by more than one printing method. The most common variety is created by those printed by photogravure versus lithography. If you are not familiar with these two forms of printing, then identifying your first single specimen may pose a bit of a challenge. However, as you accumulate more stamps and create a "reference" copy of each, the differences between the two printings are certainly noticeable - and therefore collectible.
The easiest place to tell the difference between photogravure and lithographed stamps is in the denomination. As the illustration shows, lithographed stamps produce a very clean-edge to the value while photogravure stamps have a "bumpy" edge to the value (it is actually the colour 'cells' from the printing process that "intrude" into the white space).
This may or may not be obvious to identify. Tagging is applied to the stamp in an effort to trigger cancellation and sorting equipment. Various styles of tagging have been used throughout the Machin period.
Identifying tagging may require the use of an ultraviolet light. On the other hand, the tag bars on some stamps can be spotted quite easily with the naked eye.
Certainly a stamp with a Centre band phosphor bar is different from one with two phosphor bands (one down each side of the stamp)! Shouldn't they be sorted separately?
The phosphor tagging on some stamps can be spotted by the naked eye, either by a quick glance at the stamp or by tilting the stamp at an angle. However, an ultraviolet light will be required to check the tagging on other stamps.
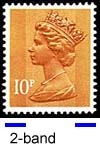 Different types of tagging and positioning of phosphor bands occurs on Machin stamps:
- 2-band "blue". This tag is "phosphorescent" - it will have a slight afterglow when the UV light source is removed. It exists in either 8 or 9.5mm bands centered down the vertical perforations (thus there are 4 or 4.75mm bands on both sides of the stamp).
- the above 2-band tagging also exists as "JET" phosphor. This phosphor has a slight yellow colour - easily separated from the above tagging. Stamps with JET phosphor include:
- ½p turquoise
- 1p crimson
- 1½p charcoal black
- 2p dark green
- 2½p pale magenta
- 3p ultramarine (including Northern Ireland, Scotland, and Wales)
- 4p rust brown
- 5p greyish violet (Scotland)
- 6p light green
-
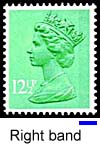
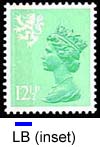
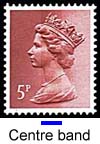 1-band "blue". As the 2-band above, but only one band is applied to the stamp. It is placed either at the left (Left band), middle (Centre band), or right (Right band). Some stamps have all three positions available!
 - 1- or 2-band "yellow". This tag is "fluorescent" - it will only glow when the UV light is on. It is very distinctive compared to those above. Three types are known: yellow, green, and yellow-green (the latter is sometimes referred to as "Novaglo").
- 1- or 2-band "yellow" inset. As the previous tag but the bars do not "touch" the vertical perforation holes - they are inset slightly from the edges of the stamp. This was done to lessen the wear and tear on the perforating pins.
- all-over, or embedded phosphor (aka. PCP/PCP1). This "tag" is "phosphorescent".
On a few occasions Machins have appeared with “back prints” — 3 such designs have been used. These stamps indicated they were sold at a discount. This back print was printed on top of the gum. As such, you may not find many examples on used Machins since soaking the used stamp from its envelope/cover/piece removes the gum at the same time.
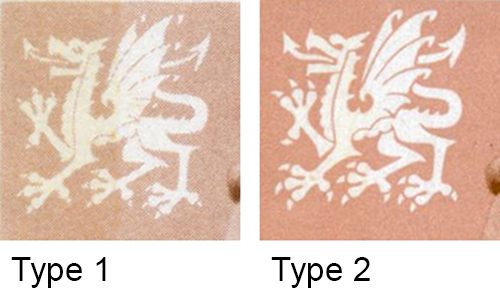 This refers to the symbol found in the upper left corner of Regional Machins.
Three of the four countries have a few stamps that exist with two different symbol types (only the Isle of Man does not have symbol types).
A magnifying glass may be required to spot the subtle differences in the symbol types. [ click for illustrations and details ]
Until 1981, all Machin stamps were printed by Harrison & Sons.
Five different printing companies have been employed to print Machin stamps. By far the most prolific (and the first) is Harrison:
- Harrison (since the beginning; name changed to De La Rue Sep 8/97)
- Enschedé
- Questa (used lithography until Dec 98)
- Waddington (contract ended in 1986; used lithography)
- Walsall (used lithography until mid 97)
- Cartor
On a few stamps, notably the Ist Millennium and the ‘small’ high-value engraved stamps, several varieties can be determined based on different printers. Subtle differences exist between the printings of these various printers that allow the specialist to identify the different printings.
With a magnifying glass and a little study, this can be quite apparent.
[ A selected number of Machins have appeared in certain booklets with one or two imperforate sides (i.e. straight edge). These are easily recognized - click here for a list. ]
Machins have been issued in various formats: sheet, coil, and booklet. What is the source of the stamp you are studying? A close look at the perforations will tell you whether the stamp is self-adhesive, or, if not, whether it came from a sheet or coil or booklet.
Water-activated:
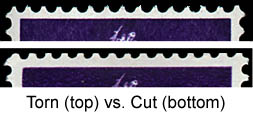
Machin stamps that come from water-activated coils and certain booklets are separated (during the printing process) by cutting down the middle of the perforations (coils will have two opposite sides cut in this manner while booklets will have one, or two adjacent sides, cut).
Stamps that are separated by the public will be torn, leaving a ragged edge to the perforations (and typically small paper fibres). Thus, a stamp that is torn on all four sides must come from a sheet (with the exception of a few booklets); a stamp that is torn on two opposite sides but cut on the other two sides must be from a coil; similarly, a stamp cut on one or two adjacent sides but torn on the other sides is from a booklet.
In North America, coil stamps are (typically) imperforate on two opposite stamps - very noticeable and much sought after. However, the Machin stamps require a closer look to spot the coil and booklet stamps. If you collect Canada/USA coils (because they look so much different from stamps issued in sheet format), then you must also collect single specimens of Machins issued in these formats (the logic makes sense doesn't it?).
 A magnifying glass will likely be required to spot these.
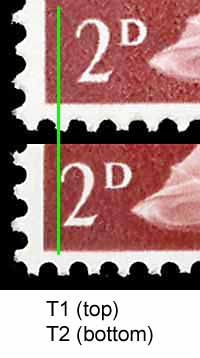
Some stamps exist where the value is set "high", "low", "middle", "close", etc. Although the differences may be slight in some cases, they do create a collectible variety.
This illustration shows the 2d lake brown value and the two different settings found on it.
Value type
Some stamps exist with "thin" and "thick" value types. Although the differences may be slight in some cases, they do create a collectible variety.
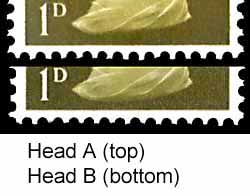 Various Head types (referring to the portrait of the Queen) have been required over the years.
This is due in part to the different printing methods employed and the amount of room available
on the stamp to print the image (due to regional symbols, value size, etc.).
Various Head types (referring to the portrait of the Queen) have been required over the years.
This is due in part to the different printing methods employed and the amount of room available
on the stamp to print the image (due to regional symbols, value size, etc.).
A few stamps do exist with more than one head type. Although the differences can be subtle, the different head types are in effect a different design (technically speaking). As such, they are certainly collectible. [ click for illustrations and details ]
I have found this to be the trickiest of all varieties to differentiate.
Is the paper OCP, FCP, ACP, PCP, etc.?
With a magnifying glass, this can be quite apparent.
A handful of stamps exist where the "white" of the denomination is not completely white - there is a screened effect of dots throughout the value. Certainly a bit more specialized variety but still certainly collectible. In fact, if you have hundreds or thousands of the "same" stamp, finding a few of these screened values amongst the pile can be quite rewarding.
Naturally, this sorting option is only applicable to mint stamps. Three basic types of gum on water-activated Machins have been used:
- Gum arabic
- Dextrin
- PVA
Trying to illustrate “gum” is rather difficult here. As with the [23. Paper] sorting criteria, I would recommend buying an example of each to use as reference copies.
Naturally, this sorting option is only applicable to mint self-adhesive stamps. Some late-issue 2015-type security Machins, printed by Walsall, began including a light-grey ‘wavy’ text printed on top of the backing paper. It is visible between the mint stamps, and, when the stamp is removed from the pane/booklet, the full text on the backing paper becomes apparent.
The stamp itself does not show any of this text. Thus, once the stamp is removed from the pane/booklet, this sorting method is no longer applicable (unless that issue only comes the one way, but the backing paper would no longer be available anyway).
Two other types have since appeared, where certain rows of text are inverted.
There you have it - TWENTY-SIX different ways to sort and separate your used Machin stamps! Shall I simply say ... happy sorting?!?!?!?
For even more varieties on Machin stamps, check out The Complete Deegam Machin Handbook
(simply the best Machin
handbook available anywhere) by Douglas Myall -
click for details.
Booklet pane numbers used courtesy the
Modern British Philatelic Circle
who publish 'The Bookmark' Catalogue
![]()
© 1996-2023, 2024 Robin Harris
Adminware is a trademark of Adminware Corporation.